Architectural Shingle Nailing Pattern
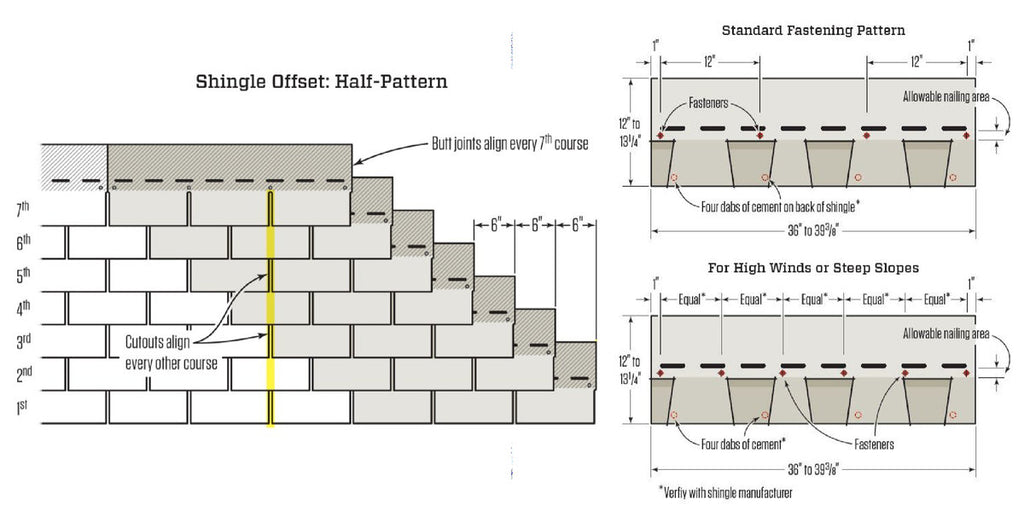
Architectural Shingle Nailing Pattern - That's why gaf's timberline ® shingles with layerlock™ technology * were designed with the strikezone™ nailing area, the industry's largest nail zone. The purpose of this sample board is to show the proper nail position for three tab shingles. Many manufacturers recommend a modified pyramid pattern where the offsets between shingles aren’t equal measurements but random themselves. Begin at the lower left corner of your roof, laying your first row of shingles. Secure each shingle with roofing nails at the top edge of the tile. Install it by driving nails into place near the top edge, and make sure the board is at a slight angle. Web install it with 6 inches of clearance at the bottom. This strip should be 1.25 inches wide. Place the next row of shingles directly on top of the first, making it two tiles thick. Web do your roof shingles standing up during a very windy day? Nail each shingle with four nails, positioning them just below the adhesive strip and near the edge. 15k views 3 years ago. This row should peek over the eaves by about a half inch (1.3 centimeters). Place the next row of shingles directly on top of the first, making it two tiles thick. Install the recommended number of nails per shingle. Typically, use four nails per shingle, placing them about 1 inch above the cutouts and 6 inches from the ends. Offset the joints of adjacent shingles in a staggered pattern to provide better protection against leaks. Web roof shingle fastening patterns affect the roof's wind performance and roof leakage. Architectural shingles, being thicker and heavier, require a bit more fastening. Web when embarking on a roofing project, selecting the right type of nails is crucial. Web when embarking on a roofing project, selecting the right type of nails is crucial. Typically, use four nails per shingle, placing them about 1 inch above the cutouts and 6 inches from the ends. Web roof shingle fastening patterns affect the roof's wind performance and roof leakage. In most cases, 4 nails are adequate. Install the recommended number of. When installing thicker shingles, you may need to use a longer nail in order to penetrate the osb beneath fully. This guide provides an extensive overview of roofing nails for shingles, ensuring you. Architectural shingles, being thicker and heavier, require a bit more fastening. Web one of the key components to shingle performance, regardless of manufacturer, is proper nailing. Web. Web one of the key components to shingle performance, regardless of manufacturer, is proper nailing. Nail each shingle with four nails, positioning them just below the adhesive strip and near the edge. Install the recommended number of nails per shingle. Typically, use four nails per shingle, placing them about 1 inch above the cutouts and 6 inches from the ends.. Drive nails straight so that the heads are flush with the shingle surface; Web start at the bottom. Most manufacturers recommend using four nails per shingle. When installing thicker shingles, you may need to use a longer nail in order to penetrate the osb beneath fully. The architectural shingle layout pattern requires that tiles do not line up from row. This strip should be 1.25 inches wide. Web do your roof shingles standing up during a very windy day? Web one of the key components to shingle performance, regardless of manufacturer, is proper nailing. In this q &a, stephen hazlett, president of hazlett roofing & renovation ltd. Place the next row of shingles directly on top of the first, making. Typically, use four nails per shingle, placing them about 1 inch above the cutouts and 6 inches from the ends. Web installing architectural shingles is not a difficult process, but it does require the correct tools and an understanding of the process. Web a large nailing area can make shingles easier and quicker to install while also increasing nail placement. Offset the joints of adjacent shingles in a staggered pattern to provide better protection against leaks. Secure each shingle with roofing nails at the top edge of the tile. 15k views 3 years ago. Web start at the bottom. Web nailing pattern for architectural shingles. Secure each shingle with roofing nails at the top edge of the tile. Architectural shingles, being thicker and heavier, require a bit more fastening. Roofing nails are specifically designed for attaching shingles to roof decks, and choosing the correct type can significantly impact the durability and longevity of your roof. Web a large nailing area can make shingles easier and. Most manufacturers recommend using four nails per shingle. Install the recommended number of nails per shingle. Offset the joints of adjacent shingles in a staggered pattern to provide better protection against leaks. Web installing architectural shingles is not a difficult process, but it does require the correct tools and an understanding of the process. Do not place fasteners on or. Install it by driving nails into place near the top edge, and make sure the board is at a slight angle. Most manufacturers recommend using four nails per shingle. Web a large nailing area can make shingles easier and quicker to install while also increasing nail placement accuracy to help secure them better to the roof structure. Secure each shingle. When installing thicker shingles, you may need to use a longer nail in order to penetrate the osb beneath fully. In this q &a, stephen hazlett, president of hazlett roofing & renovation ltd. Web a large nailing area can make shingles easier and quicker to install while also increasing nail placement accuracy to help secure them better to the roof structure. Web nail the shingles in place using a roofing nail gun or hammer, driving nails into the designated nailing areas on the shingles. Install the recommended number of nails per shingle. Roofing nails are specifically designed for attaching shingles to roof decks, and choosing the correct type can significantly impact the durability and longevity of your roof. For these shingles, roofers typically use six nails per shingle. This row should peek over the eaves by about a half inch (1.3 centimeters). The architectural shingle layout pattern requires that tiles do not line up from row to row, so each beginning tile must be cut six inches more than the previous. This strip should be 1.25 inches wide. This chapter will demonstrate how to properly nail roofing shingles. Offset the joints of adjacent shingles in a staggered pattern to provide better protection against leaks. Secure each shingle with roofing nails at the top edge of the tile. Web install it with 6 inches of clearance at the bottom. In most cases, 4 nails are adequate. Begin at the lower left corner of your roof, laying your first row of shingles.
Nailing Pattern For Architectural Shingles Nail Ftempo

Nailing Pattern For Architectural Shingles Nail Ftempo

Proper Nailing Pattern For Architectural Shingles Nail Ftempo

Nailing Pattern For Architectural Shingles Nail Ftempo

Roof Shingle LayOut and Nailing Patterns GutterBrush

How to Shingle a Shed With 3 Tab and Architectural Shingles

The standard nailing for asphalt shingles is a fournail pattern, with

Architectural Shingle Nailing Pattern The Architect
Roof Shingle LayOut and Nailing Patterns GutterBrush

HOW TO INSTALL 6 NAILS PER SHINGLE YouTube
Architectural Shingles, Being Thicker And Heavier, Require A Bit More Fastening.
Web Installing Architectural Shingles Is Not A Difficult Process, But It Does Require The Correct Tools And An Understanding Of The Process.
Place The Next Row Of Shingles Directly On Top Of The First, Making It Two Tiles Thick.
This Guide Provides An Extensive Overview Of Roofing Nails For Shingles, Ensuring You.
Related Post: